Slow Start Guide: Difference between revisions
No edit summary |
|||
| Line 152: | Line 152: | ||
=Darkhaven= | =Darkhaven= | ||
When you have acquired your starting gear, practiced any skills/spells, and explored the academy a bit, you're ready to proceed into Darkhaven. | When you have acquired your starting gear, practiced any skills/spells, and explored the academy a bit, you're ready to proceed into New Darkhaven. | ||
*At the Robed Figure, go up. | *At the Robed Figure, go up. | ||
*Type 'help map' to bring up the in-game map of Darkhaven | *Type 'help map' to bring up the in-game map of Darkhaven | ||
**A more detailed map can be found on [[Rodpedia https://rodpedia.realmsofdespair.info/wiki/New_Darkhaven]] | |||
This is the main town in the game. It has all the supplies you might need, and is where most players will be running around. It is the 'center' of the game. | |||
Revision as of 17:40, 29 May 2023
Ok so here is a fulllllllllll walkthrough of the starting area and first steps in the game.
After character creation, you'll navigate The Sunless Sea (a pre-auth entry area), then explore The Halls of Knowledge, before venturing into the town of Darkhaven proper.
Character Creation
Since this is a slow start guide, maybe you want to take 10 minutes to read these pages:
Class Info
Race Info
That said, I would suggest a Dwarf Paladin or Gnome Cleric as your first character.
The Sunless Sea
This area is basically a simple path, with hints on what commands to use to find stuff and acclimate to the game.
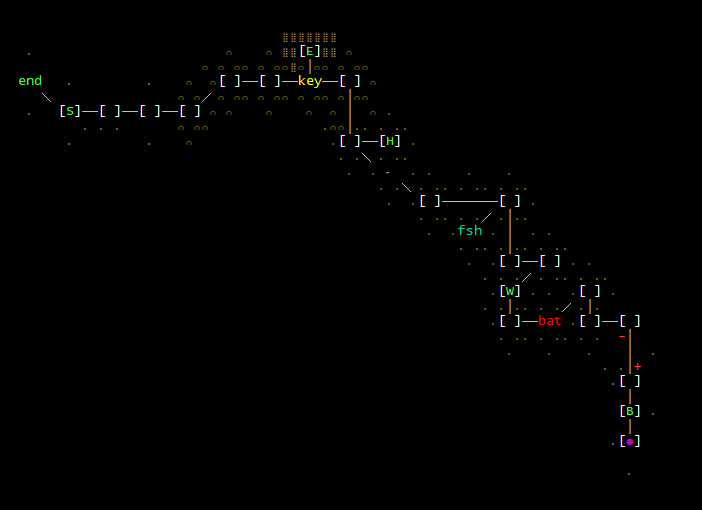
Walk along the path and read. Here is a map - you begin in the bottom right corner (pink dot)
Legend:
     B = Beacon
     W = Weapon and Shield
     H = Hide (armor)
     E = Earring
     S = Sign  (look sign, and say appropriate phrase to proceed)
   end = Set your stats and "pull cord" to enter game if name has been authorized
Naming
In order to enter the game, your name must be approved by an immortal. You can do 'who imm' to check if any are online.
If no Immortals are available, you can use 'name random' to obtain a pre-authorized random name.
Does this situation suck? Yes, kinda. For your first char, it doesn't matter, just use a random name if no Imm's are online. Once you are more familiar with the game you'll know more about the Immortals and can wait for one to be available when you make your next character so you can pick a better name.
Stat Training
There is a whole damn system for stats and stuff, as you would imagine. You must assign your stats now before entering the full game. They cannot be changed later.
Stats are set using the 'train' command:
Command: train
 Syntax: train <stat> <increment>
Example: train dex 2
Example: train lck -1
For full information please see: Stats
Once your stats are set and your name has been authorized, 'pull cord' to enter the real game.
The Halls of Knowledge
- Upon pulling the cord you will attain Level 2 and enter the full game.
- You start inside "The Halls of Knowledge", and area which is often also called 'The Academy", which is like the really crappy version of Hogwarts and resides within our main town.
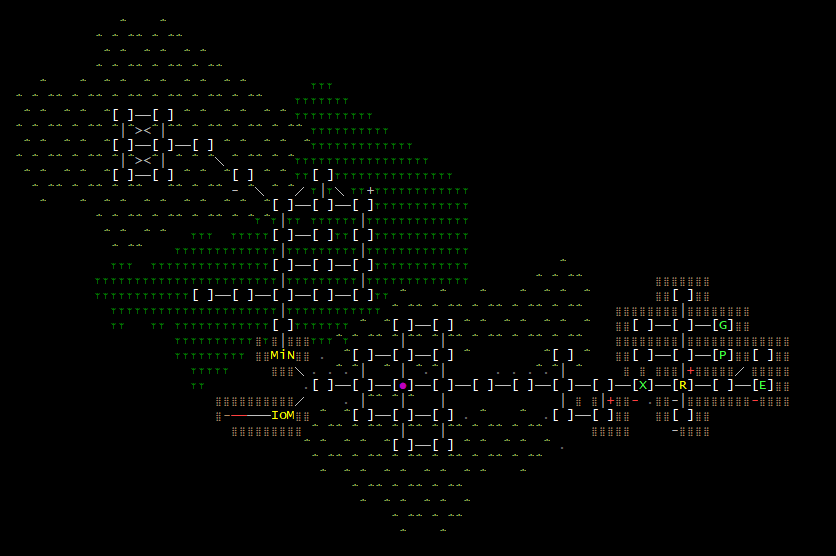
- You will find yourself at the yellow "R" on the map, where The Robed Figure is standing.
- This is the center of the area, we'll be using this as a landmark moving forward.
- Eastward is where you acquire starting equipment
- Northward is where you practice skills/spells and can learn more information about the game
- Westward is an area where you can practice fighting things.
- This is the center of the area, we'll be using this as a landmark moving forward.
Legend:
     R: Robed Figure
     E: Equipment chambers
     X: Return from Equipment chambers
     P: Practice Skills/Spells
     G: Guide
   MiN: A Moment in Nature (sub-area)
   IoN: Isle of Monkeys (sub-area)
Equipment Mobs
- Proceed East to the "E" and sit there for a moment, be patient, you will eventually be transported to a new section where you can obtain starting gear.
- Upon being transported, you'll see a new statue who commands you to look at him.
look statue
say bestow
- He will hand you a pouch that contains 2 heal potions and a recall scroll.
exam pouch
- Proceed Down
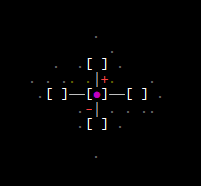
- You will now be surrounded by tiny little things you whack for basic gear, which we call the 'cage mobs'. The layout of this section of the area is a straight-forward design:
- Enter into each direction and kill the mobs within. Wear everything you receive after each kill:
wear all
- Kill all mobs and 'wear all' after each on this floor. You can do 'strike' to input additional hits on them while fighting.
- Proceed Down from the central room to the next floor:
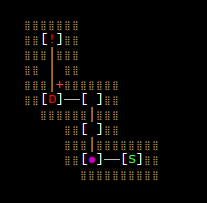
Legend:
     S: Shop
     D: Dragonsnake
     !: DeathTrap!
- You begin at the pink dot. This section teaches you how to read room descriptions for useful info, and to avoid death traps.
- To the east is a simple store (no items are required to be bought here)
- Proceed northward to the Dragonsnake! Fight and kill him! Strike strike strike!
- If you are about to die, you can quaff an elixir you got from the statue earlier to cure some hp:
q elix pouch
- Once dead, wear his gear, and proceed upwards:
wear all
open up
up
You will find yourself at the X on the above map of The Halls of Knowledge. You now have a choice on how to proceed: learning or fighting.
Learning
The section north of the Robed Figure is all based on knowledge, skills/spells practice, and lots of reading.
- At the P on the map you can practice any skills/spells you have to learn.
- To view those, just type 'practice' to see your current list.
- To view things you WILL learn, you can do 'slist 2 10' to see things learned in levels 2-10, or just 'slist' alone to view your entire skills list through level 50.
- Anytime you level you will return here to practice the new things you acquired.
- At the G on the map is a Spirit Guide.
- They will tell you some information, and ask some questions, all based on the surrounding rooms informational materials.
- If you loooove reading, go check out those other rooms, read up, then visit the Spirit Guide for some small rewards and suggestions
Fighting
- The entire area west of the Robed Figure is a small playground where you can try your hand at murder.
- Mobs get more difficult the farther west you go.
- Far west, there are 2 sub-areas you can enter and explore. My map shows one in full, the other is not displayed so you can try your hand at exploring sans-map.
If you are new to muds and want to experience how fighting works, take a moment to go kill some things.
Truth be told, this area sucks for gaining xp and leveling up, so its not really worth your time unless you just want to see how a game like this works.
If you DO want to explore it anyways and kill your way to the end, you'll want to go grab some heal potions first and return here after.
- IF YOU DIE you will awake at the temple of Notre Dame in Darkhaven. See 'help map'.
- Go #5 s;e;e;se to DH Square then #3 e;s;d to return to Robed Figure in Halls of Knowledge.
Darkhaven
When you have acquired your starting gear, practiced any skills/spells, and explored the academy a bit, you're ready to proceed into New Darkhaven.
- At the Robed Figure, go up.
- Type 'help map' to bring up the in-game map of Darkhaven
- A more detailed map can be found on Rodpedia https://rodpedia.realmsofdespair.info/wiki/New_Darkhaven
This is the main town in the game. It has all the supplies you might need, and is where most players will be running around. It is the 'center' of the game.


