Slow Start Guide
This guide takes it realllly slooowwww, and fully explains basically fucking everything you will be doing, and why, and contains some details about where/why you're doing things that my Power Guide doesn't bother explaining.
Related Pages:
- Questions ABOUT the game? What type of game is it? What will you be doing? See General Game Facts for Newbs
- Newb Frequent Asked Questions
In this guide we'll cover character creation, and you'll navigate The Sunless Sea (a pre-auth entry area), then explore The Halls of Knowledge, before venturing into the town of Darkhaven proper. Then we'll head to new areas New Ofcol, Shattered Refuge, and Coral Depths to begin leveling up.
Character Creation
Since this is a slow start guide, maybe you want to take 20 minutes to read these pages:
Class Info
Race Info
That said, I would suggest a Dwarf Paladin or Gnome Cleric as your first character.
The Sunless Sea
This area is basically a simple path, with hints on what commands to use to find stuff and acclimate to the game.
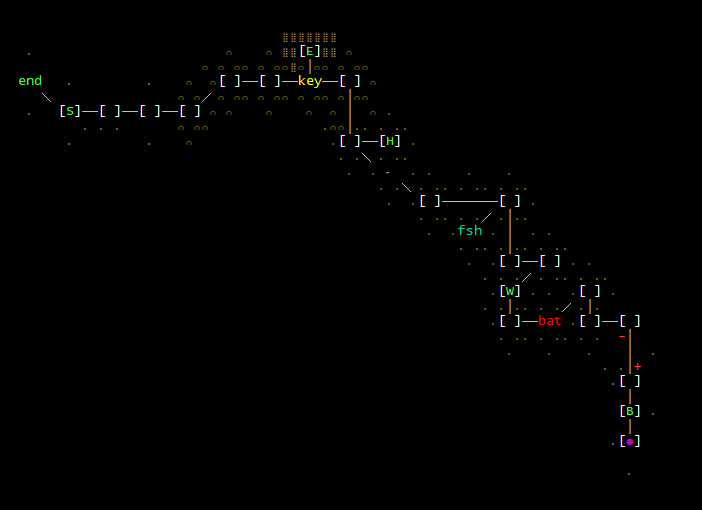
Walk along the path and read. Here is a map - you begin in the bottom right corner (pink dot)
Legend:
     B = Beacon
     W = Weapon and Shield
     H = Hide (armor)
     E = Earring
     S = Sign  (look sign, and say appropriate phrase to proceed)
   end = Set your stats and "pull cord" to enter game if name has been authorized
Naming
In order to enter the game, your name must be approved by an immortal. You can do 'who imm' to check if any are online.
If no Immortals are available, you can use 'name random' to obtain a pre-authorized random name.
Does this situation suck? Yes, kinda. For your first char, it doesn't matter, just use a random name if no Imm's are online. Once you are more familiar with the game you'll know more about the Immortals and can wait for one to be available when you make your next character so you can pick a better name.
Stat Training
There is a whole damn system for stats and stuff, as you would imagine. You must assign your stats now before entering the full game. They cannot be changed later.
Stats are set using the 'train' command:
Command: train
 Syntax: train <stat> <increment>
Example: train dex 2
Example: train lck -1
For full information please see: Stats
Once your stats are set and your name has been authorized, 'pull cord' to enter the real game.
The Halls of Knowledge
- Upon pulling the cord you will attain Level 2 and enter the full game.
- You start inside "The Halls of Knowledge", and area which is often also called 'The Academy", which is like the really crappy version of Hogwarts and resides within our main town.
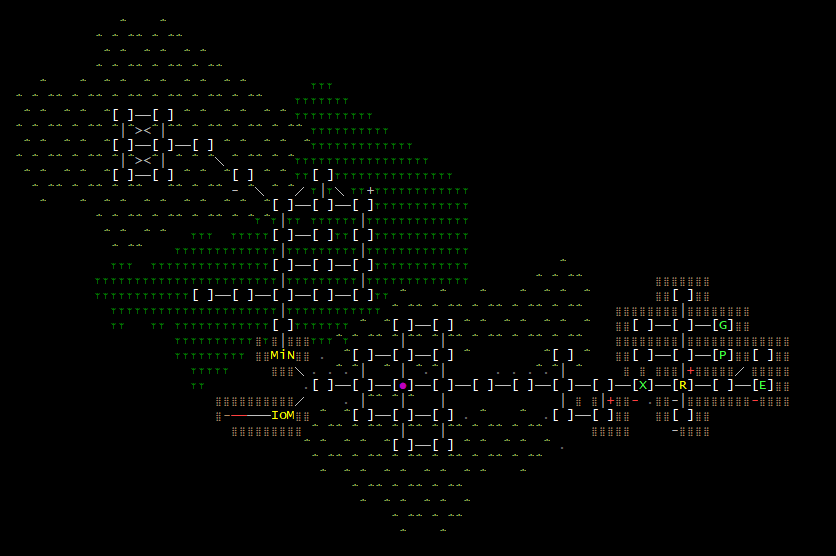
- You will find yourself at the yellow "R" on the map, where The Robed Figure is standing.
- This is the center of the area, we'll be using this as a landmark moving forward.
- Eastward is where you acquire starting equipment
- Northward is where you practice skills/spells and can learn more information about the game
- Westward is an area where you can practice fighting things.
- This is the center of the area, we'll be using this as a landmark moving forward.
Legend:
     R: Robed Figure
     E: Equipment chambers
     X: Return from Equipment chambers
     P: Practice Skills/Spells
     G: Guide
   MiN: A Moment in Nature (sub-area)
   IoN: Isle of Monkeys (sub-area)
Equipment Mobs
- Proceed East to the "E" and sit there for a moment, be patient, you will eventually be transported to a new section where you can obtain starting gear.
- Upon being transported, you'll see a new statue who commands you to look at him.
look statue
say bestow
- He will hand you a pouch that contains 2 heal potions and a recall scroll.
exam pouch
- Proceed Down
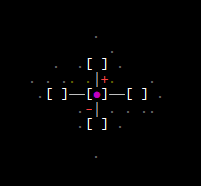
- You will now be surrounded by tiny little things you whack for basic gear, which we call the 'cage mobs'. The layout of this section of the area is a straight-forward design:
- Enter into each direction and kill the mobs within. Wear everything you receive after each kill:
wear all
- Kill all mobs and 'wear all' after each on this floor. You can do 'strike' to input additional hits on them while fighting.
- Proceed Down from the central room to the next floor:
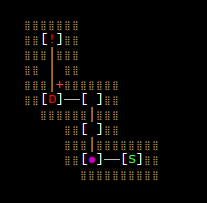
Legend:
     S: Shop
     D: Dragonsnake
     !: DeathTrap!
- You begin at the pink dot. This section teaches you how to read room descriptions for useful info, and to avoid death traps.
- To the east is a simple store (no items are required to be bought here)
- Proceed northward to the Dragonsnake! Fight and kill him! Strike strike strike!
- If you are about to die, you can quaff an elixir you got from the statue earlier to cure some hp:
q elix pouch
- Once dead, wear his gear, and proceed upwards:
wear all
open up
up
You will find yourself at the X on the above map of The Halls of Knowledge. You now have a choice on how to proceed: learning or fighting.
Learning
The section north of the Robed Figure is all based on knowledge, skills/spells practice, and lots of reading.
- At the P on the map you can practice any skills/spells you have to learn.
- To view those, just type 'practice' to see your current list.
- To view things you WILL learn, you can do 'slist 2 10' to see things learned in levels 2-10, or just 'slist' alone to view your entire skills list through level 50.
- Anytime you level you will return here to practice the new things you acquired.
- At the G on the map is a Spirit Guide.
- They will tell you some information, and ask some questions, all based on the surrounding rooms informational materials.
- If you loooove reading, go check out those other rooms, read up, then visit the Spirit Guide for some small rewards and suggestions
Fighting
- The entire area west of the Robed Figure is a small playground where you can try your hand at murder.
- Mobs get more difficult the farther west you go.
- Far west, there are 2 sub-areas you can enter and explore. My map shows one in full, the other is not displayed so you can try your hand at exploring sans-map.
If you are new to muds and want to experience how fighting works, take a moment to go kill some things.
Truth be told, this area sucks for gaining xp and leveling up, so its not really worth your time unless you just want to see how a game like this works.
If you DO want to explore it anyways and kill your way to the end, you'll want to go grab some heal potions first and return here after.
- IF YOU DIE you will awake at the temple of Notre Dame in Darkhaven. See 'help map'.
- Go #5 s;e;e;se to DH Square then #3 e;s;d to return to Robed Figure in Halls of Knowledge.
Darkhaven
When you have acquired your starting gear, practiced any skills/spells, and explored the academy a bit, you're ready to proceed into New Darkhaven.
- At the Robed Figure, go up.
- There is a store to the east that sells food, a drink container, as well as potions to buff stats. Very useful stuff here!
- Go north to arrive on Horizon Road and then #3 w to arrive at Darkhaven Square
- Type 'help map' to bring up the in-game map of Darkhaven
- A more detailed map can be found on [Rodpedia]
This is the main town in the game. It has all the supplies you might need, and is where most players will be running around.
- Darkhaven Square (Common referred to as "dh [ ]" or just "the [ ]" is the geographic center of the entire world.
- From DH [ ] it is
#3 e; s; dto return to the Robed Figure in the Halls of Knowledge.
- From DH [ ] it is
- What to do, what to do? Well if you're slow-starting the game feel free to explore around and check it all out, you really can't get into much trouble here.
- The only sections to avoid would be Dragon Cult & Darkhaven Art Gallery, which are full sub-areas. Avoid those for now.
Here are some other places of note:
Notre Dame
- Upon death, your body will arise inside Notre Dame Cathedral.
- It's
#5 s; #2 e; seto return to Darkhaven Square
- It's
Market Street
Here you will find many shops, know them well! The Scrolls and Potions shops will be frequently used, so know them well.
- You can only buy items of your level or lower.
- When purchasing items, you can purchase multiple with 'buy ## <thing' up to a max ## of 50.
- The shopkeeper will give them to you in a bag.
- You can empty the shop bag into your main container (which will be a dirty burlap sac upon starting the game)
empty shop sac
drop shop
If you forget to drop one, or end up with multiple shop bags, you can use a prefix numeral to refer to each:
exam 1.shop
exam 2.shop
exam 3.shop
If you drop one, they do renumber however, so double-check what's what again afterwards.
Polshir's Scrolls
Shown as #1 on the 'help map' display.
Here you should buy several recall scrolls for sure, and as a new player you may want several magical tablets of disclosure.
Recall scrolls are used to warp you back from anywhere in the game to New Darkhaven, 1 north of Darkhaven Square.
Tables of Disclosure are used to cast identify on an item so you can see its stats and attributes.
Scroll Usage: To use a scroll, you 'recite' it:
recite recall
recite tablet <item name>
A simple recall alias you might want to set up in your mud client would be:
#ALIAS {recall} {get recall sac;recite recall}
Zelah's Apothecary
Shown as #2 on the 'help map' display.
- This is the main potion shop in the game. You will be here OFTEN.
Zelah sells several varieties of heal potions, and one mana potion.
- Heal potions strength increases as the potion color gets darker.
- You'll want to buy the highest level heal potion you can, at level 10 you can use full 100hp heal potions:
  maroon:  cure light           20hp
    puce:  cure serious         25hp
  purple:  cure critical        40hp
sanguine:  2x cure critical     65hp
  violet:  heal                100hp
blue: restore mana 90mn
- Note that you should NOT buy mana potions here. These pots are heavy (2 lbs) and expensive.
- There are lighter/cheaper options sold at Race Hometowns and in Guilds
- You could also check out Smokeable Herbs that restore mana instead of using potions.
- A player also runs a bot here currently that will buy potions for you at the best price available. His name is Ched, see 'whois ched' for instructions
- This is because shopkeepers charge different rates based on players Race and Charisma stat. (They are racist and give deals to their own race)
- So, many players create 'buyer' chars that match the shopkeepers race and only wear gear to max Charisma.
Xygian's Mystical Objects
Shown as #3 on the 'help map' display.
Items of note here are the ball of light and the rune-covered bag.
- If you die and are naked and want to go find your corpse to retrieve your gear, you will likely need to buy a ball of light so you can see wtf you're doing.
- The rune-covered bag is another small container, slightly larger than the dirty burlap sac you start with.
- Though I'll be taking you to get a better container in the next section, you may want to pick up a rune-covered to use as a secondary container for spare crap.
Buy some recall scrolls before continuing!
New Ofcol
Once you've explored Darkhaven a bit, and bought some recall scrolls at least, the first thing I would send you out into the world to do is buy a much better container so you can store your crap.
- To the north of Darkhaven is another town named New Ofcol, and a man named Jim who sells a lovely small birch chest.
- But how to get there? Where is this Jim fella?
Well, that's up to you. You can either be super rp and just try to find it, or you can use a website that tells you directions and provides a map:
- Vague directions for those who like to explore:
- From Darkhaven Square go westward out of the town gate, then proceed north along the trail rounding Darkhaven all the way north until you hit a dead end in the Shadow Grove. From there, just westward and then northward, and you'll find the first streets of Ofcal. Once within the area, you'll just have to explore your way around to find the market section and the blacksmith named Jim. It's a civil town and a safe well patrolled city, you can have no fear fully exploring its streets.
- Specific instructions for the easy way to do things:
- See: [Rodpedia] and copy/paste those directions, run them from Darkhaven Square
- Keep that map up somewhere visible on your screen and find Jim on it, and navigate to him in the Mud while glancing at that map.
You can alsooo set up mapping within most mud clients so you have maps within the program and don't need to cross reference over to rodpedia. That's the much more efficient way to go and is totally kick ass for a number of reasons, but its also a huuuuuuuuge bitch to set up, so, maybe wait on that until your wife has divorced you, you've lost your job, and you have the time.
Once you've got the birch chest, you can dump your existing containers into it with the 'empty' command like these examples:
empty sac chest
empty rune chest
empty shop chest
Afterwards, recall back to Darkhaven so we can prep up and truly go out adventuring.
Shattered Refuge
The first area you should go level up in is Shattered Refuge.
- First, purchase and pack your supplies into the small birch chest:
   20-50 of the highest level heal potion you can purchase from the apothocary
   Recall scrolls (I usually buy them 20 at a time)
- Second, get spelled up with these buff spells (type 'score' or 'affect' to see what spells currently affect you):
- The blessing of Thoric
- This spell is cast on all players under level 20 by the Robed Figure in the Halls of Knowledge (remember him?)
- Simply walk into that room, and you get it:
#3 e;s;d
- The blessing of Thoric
- Leveling Spells
- There are a number of spells clerics/mages can cast which we call Leveling Spells which increase your stats and give you some resistances to damage.
- Many players run bots either ne or nw of Darkhaven Square which will cast these on you. Try going ne or nw of the square and saying "all".
- If some guy starts 'doin somethin' then its probably working. Check 'score' or 'affect' to see if you are being spelled up
- If no such bots are online, you can alternatively purchase some potions that do the stat buffs at the store in the Academy (above and east of Robed Figure)
- From Darkhave Square:
#3 e; s; e; list- Buy all the 'potion of minor <stat>' and quaff em all
- From Darkhave Square:
- See below note on "Sanctuary"
Once you've got supplies and spells, you're ready to head out.
Again, we can do this the easy way or the hard way:
- Hard Way:
- Head south of Darkhaven, into the forest of Miden'nir. Go as deep into that forest as you can, and then begin exploring westward. Be wary, for there are paths that are not visible to the naked eye, so even when you think there is no more way west there may be after all! Once within the refuge, explore until you find the scientific community, their assistants are the exact type of prey you would learn greatly from.
- Easy Way:
- See: [Rodpedia]
- Kill Assistant Scientists & Scientists (They're in the rooms south of the receptionist on the rodpedia map above)
- See: [Rodpedia]
Important Note: The scientists have an item 'a gnome concoction' that you will want to get and save as many as you can. This casts 'sanctuary' the primary fighting spell in the game which reduces the damage you receive by 50%. You must always have sanctuary on when fighting!
- If you did not get spells from spell bots in town, then you will not have sanctuary when you first go to Shattered Refuge
- Kill some assistant scientists (you may level once or twice), then kill a regular scientist, get and quaff their concoction:
get conc corpse
q conc
- Keep an eye on 'affects' or 'score' as you fight to check sanctuary and see how many rounds until it expires.
- When it expires you will see yellow text that says:
The luminous aura about your body fades away.
Kill loottsss of scientists and stock up on those potions, put them in your birch chest and do 'q concot chest' when you need to reapply sanctuary.
The gnomes have a few other potions as well, perhaps an identify tablet from Polshir's would be handy to learn what such things do.
- You can freely explore this whole area really.
- As a level 2 I would stick to the assistant scientists and the kids and 'small' stuff. As you gain level, you can take em all on.
- Eventually, you will need to recall to restock and respell.
- Keep resetting and returning here until you are level 5 or 6.


